Thursday, November 7, 2019

Bow Drill - Horse Chestnut

It's always irritating to have a failure, but then there's typically more to learn from getting things wrong.

Today I went out and sourced some Horse Chestnut from a group of trees I had seen before and thought would have plenty of dead, dry and standing to collect.  As it happened there was not a huge amount - just about everything was green, but there was enough to collect for a set.

Poor image of some fat sticky buds
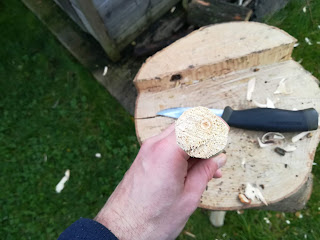
In my selected wood I could see that pith might be an issue so I collected a larger piece with the idea of carving my spindle with the pith off centre.  Good idea I reckon but ultimately poorly executed as the pith needed to be even more off centre or indeed carved out entirely (which would have meant getting a larger piece of wood).

Pith off centre but not enough


The bottom end view


The top end view
I started to burn in the set, and immediately I could tell that my base board was probably too hard.  I got a nice little shiny circle.  I roughed it up, hoping to salvage the set and tried again with a bit more pressure.  The top of the spindle collapsed and it shot out of the bow.

I reshaped the top and tried a few more times with basically the same results, and also managed to cut my finger on one of the times the top of the spindle collapsed.

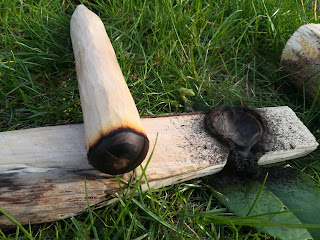
Pith causing the top of the spindle to collapse
In the final image below, you can see the problem with the hard hearth - my spindle end is very flat, and to make matters worse the bowl is very close to the right hand edge in this photo.  If my spindle was not collapsing then I may have been able to get it working, but it would have been touch and go.


Lessons:

  1. If there is a pith problem carve it well away from centre, or out completely
  2. Check the hardness of the hearth
  3. Be very careful not to have the bowl too close to an edge - a wider area of hearth may help with this


Sunday, July 14, 2019

Bow Drill - Sycamore

Yesterday I had a bit of spare time and so I went out and harvested some Sycamore to try bow drill.  It's another wood I haven't tried before - or at least I think I may have tried it a while ago, when I was initially learning the skill, but I'm pretty certain I never had success with it.

I carved the set, and perhaps had a couple of slight concerns: some of the bark once sliced off looked a little greenish, but there was certainly no moisture.  As far as I could tell the wood was dead (admittedly I did not look closely to see if there was any growth further down the branch when I harvested it, and now I was back in my garden).

The second concern was the central soft pith which was a millimetre or two in diameter, and which I thought may collapse either at the base or the top meaning I could not get the spindle burnt in.


Unfortunately I don't have a photo of these problems, I just thought I would forge ahead regardless.  I harvested some live ivy for the bearing block.  This is a great option - there's usually plenty of it around and no-one is going to give you grief for harvesting some live ivy.  I would typically feel a bit guilty about harvesting a live branch from a tree, especially since the width needs to be a decent size for a good bearing block.

As it happened my concerns were unfounded - the set burnt in quite nicely - I gave it more than I thought necessary to be absolutely sure.  Then I took a drink of water and went for the ember.  I got a good fat ember first time with very little difficulty - usually I would have to rest for 15 mins or more after burning in, but that was not the case this time.


I particularly focused on the spindle - creating a very straight and smooth cylindrical surface and this seemed to pay off.

For some reason I was expecting Sycamore to be harder to work with, but in truth it worked really well.

Sunday, March 31, 2019

Bow Drill - Alder

We headed out to Lydiard Park with the dog this morning.  We haven't been there for ages but Jo wanted to check out a dog agility event there (we've started doing this).

So while she went off for that, I knew there was a pretty good Alder carr in the park and thought I'd check it out to see if I could get some dead, dry and standing wood.

When I had a good look about I could see there were actually quite a few Alder coppices - so finding wood in the right condition and shape was not too difficult.  Unfortunately I neglected to take any ID photos, so here's something from Google to prove I actually know what indicators this tree has at this time of year.


I usually like to carve the spindle and hearth on site, since if there are problems I can search for more wood, but in this instance I was pushed for time, so I selected several pieces hoping I would have a workable set.

When I got home I carved the set below:


I was slightly concerned about a bit of punkiness on the hearth which meant it was not as wide as I would have hoped, but I reckoned I was good.  I burnt in the set using the same bearing block and bow I had from the previous post.


As you can see, the bowl is a little too close to the far edge.  I'm right handed so that edge is pointing away from me.  I thought for a second about carving the notch on that side, but decided against it as when I push the bow I thought that would potentially push the spindle out.  Instead I just ensured I had a nice upright position on the spindle, burning directly down into the hearth.

At this point I took the dog for a walk - this forced me to take 45 mins rest.  I wanted to give myself the best chance of success.

First attempt looked pretty good - smoke, ash and almost an ember.  A quick stretch, a drink of water and then attempt two.   This time I got a big fat ember and the set worked a dream.


Conclusion: Alder is a winner when it comes to bow drill.  Easily as good as Willow.  I have now added two new woods to my repertoire - awesome.


Saturday, March 30, 2019

Bow Drill - Pine

Spoiler alert - this did not go to plan.

This was actually my first attempt at Paul's challenge mentioned in the recent post on Bow Drill (Poplar).  I'll keep it short.  Here's the tree:


Here's the set I carved:

You may be able to see the major problem from the photo.  There's too much resin.  What I have done is found some promising pieces of fat wood.  When I tried to burn in the set, the below happened:


So I think I was onto a loser here.  On the plus side I did harvest some other pieces of excellent fat wood and tested them out.  I have not used fat wood before - my god, it's amazing.  It takes a spark very easily and then burns hot for easily 30 seconds - it's like birch bark on steroids.

Here's a photo of some honeysuckle I intended to use as my kindling bundle:


Lessons to learn:

  • try to select pine that is not too resinous
Bonus: what's this fungus?  I have zero clue.  It was spongy to the touch.  There may have been some alien life form incubating inside.  I didn't cut it open to find out.


Friday, March 29, 2019

Bow Drill - Grey Poplar

I decided to resurrect this blog, mainly because I wanted to write up some bushcraft experiences and it seemed easier to use this old blog rather than create something new.

I do various online courses offered by Paul Kirtley, and in a recent video he challenged his students to try bow drill with two woods that they have not succeeded with previously. Since I've only ever tried Willow (success), Lime (success) and Hazel (fail), then there are plenty of options for me.

I've done both of those woods several times, and have succeeded with them in the last few months.  I have also failed this year with Willow - a good lesson that if you don't keep honing these skills you can lose them.

On a regular walk I noticed what I believe to be Grey Poplar, so I thought that's a good starting point. It's pretty similar to Willow in many respects and so should not be too difficult.

I made up the set after referencing Dan Hume's book The Art of Fire for some pointers.  He is very specific about dimensions and so I thought I would follow what he has to say and see where it got me.  I have practiced bow drill a fair bit, but my success is certainly not as high as I would like it to be.

He mentions a hearth depth of 2cm, a spindle width of 2.5cm and a spindle height of about 25cm.  After my attempts I would say 25cm is a good starting place for burning in the set, but is probably a little long for me when trying to get the ember.  By the time I get to that stage though, the spindle will have reduced due to reshaping the top point.


The set at the start of the process, with a slightly too long spindle.  The bearing block is green ivy - the bow is one I made a while ago - I don't see any point in remaking that bit each time.

I was a little worried about the weak pith on the spindle I had selected (see image below), but the pith was off centre at the top point (just visible in the previous image) so I thought I might get away with it.


The wood seemed to be pretty effective and it wasn't too hard to burn in the set once I had reduced the spindle length down to a little below 25cm.  I was feeling confident.

So this is where reality set in and I struggled, despite plenty of smoke and ash.  I think the main areas I need to show focus are:

  1. Position - small adjustments here can make a big difference to ensure that the larger muscles in the shoulder and back are activated without tiring the bowing arm
  2. Also small adjustments in position can ensure the arm holding the bearing block does not require an undue expenditure of effort to hold the block in place.  I have not quite mastered using body weight to bear down on the block rather than brute strength
  3. Recarving the hole in the bearing block to be quite shallow to reduce friction - this made a big difference.  The hole can develop sides after a few attempts which catch the top of the spindle
I had to give up on day one because I ran out of energy.

Day Two

I really felt my set was a good one and that the materials were also very good, so the next day I got the set out again and gave it another try.  Attempt one was close but no cigar.  Attempt two was a success.


Being fresh helped but there were minor adjustments that also helped:

  1. Tightening the cord a bit - I had experienced a little slippage
  2. Reshaping the groove - the bowl had moved slightly and so the groove was no longer centred properly
  3. I did not use ash that had previously been created - I wonder if this makes the set less effective?  No idea
  4. Positional adjustments that I think really helped to recruit the correct muscles

This is very much an ongoing process!  I now have three woods under my belt though which is awesome.  Next stop any of alder, sycamore or pine.